Gear Update - September 22, 2021
In this post I write about the changes to my gear since mid July. As you will see, there have been many.
Seat Post
As I wrote in Gear Update - July 12, 2021, my saddle came loose several times after mounting it on the Cinelli Via Folli seat post. On July 15th I removed that post and reinstalled the 325mm Kalloy seat post I had been using for ten years until last November 20th. Last October I discovered a crack in the top half of the saddle clamp, so I bought another clamp whose curvature did not match that of the top of the seat post. I rode the bike with the mismatched clamp for a few weeks in November and used that clamp with the 325mm Kalloy seat post from July 15th until August 10th when I installed the correct clamp I found on eBay.

|
|
The correct clamp installed on the seat post |

|
| The mismatched clamp on the seat post |
I wrote to the seller of the Cinelli Via Folli seat post about my saddle coming loose and included pictures showing that the clamp had no knurling and that the seat post had a crack. I received a full refund from Bikeinn and was told I did not need to return the item.

|
| Cinelli Via Folli |
|
| No knurling on the clamp |

|
| Note the crack |
I'm glad to be using a seat post long enough to protect the seat tube from the rear rack, and with the correct clamp, but this is not the end of the saga of the seat post. My plan is to have David, who repaired the dent in my seat tube and the crack in the left seat stay, cut a 100mm length from the bottom of the Cinelli Via Folli seat post and bind it to my Shimano Dura Ace SP-7400 seat post with a plug he will make so that the Dura Ace post will be long enough to protect the seat tube from the rear rack.
Headset
In the last two months I experienced more and more creaking from my handlebar when I get out of the saddle. I checked both bolts in the stem and was unable to tighten them further, so I thought that maybe the creaking was coming from the mount for my handlebar bag. I also noticed a light snapping to center of my front wheel when the front end of the bike was held off the ground, a sign that the headset was near the end of its life, so I had a new Tange-Seiki Levin headset installed at Bicycle Habitat on August 18th. After that installation I was pleased to discover that the creaking had disappeared.
Left Brake Lever
The left brake lever I've been using since September of 2019 works perfectly, but its lever axle sticks out on the inside farther than it ought to do so and feels a little funny in my hand. I replaced the left brake lever with one I bought in February of 2020 that was not sold as new-old-stock but appears to never have been installed. In addition to the left brake lever I replaced the cable housing for both brakes, the bar tape, and the cable housing for the rear derailleur.

|
| Lever axle sticking out |
Bottom Bracket
After my trip on Long Island the second week of September (September 7-9, 2021 - Wildwood State Park, NY), I discovered that the fixed cup (on the right side) of the bottom bracket was loose and could not be tightened because the threads in the right side of the bottom bracket shell were worn out. Hal Ruzal told me the problem could be solved by retapping the English threads (1.37 x 24T) on both the left and right sides of the bottom bracket as Italian threads (36 x 24T) and using Italian cups with my English spindle. I can't use an Italian spindle because it would be 2 mm too long, causing the left pedal to be 2 mm too far to the left. Retapping the threads is not difficult but it's hard to find someone with both the tools and skills to do the job. I eventually found Dave Perry, who was suggested by Hal Ruzal, to retap the threads. I recommend Dave for his thorough work.

|
|
Worn English threads (1.36 x 24T) on the right side of the bottom
bracket shell |

|
| Retapped Italian threads (36 x 24T) |
I bought two pairs of new-old-stock Italian cups on eBay so that I have spares when the pair I install needs to be replaced. As Paul Simon sang, everything put together, sooner or later, falls apart. The picture below shows one cup from each of the pairs. The rubber seal between the two cups came with the silver cup. Unfortunately it is too small. When I contacted the seller about this he told me he had sold many sets of the silver cups (from Deore XT bottom bracket BB-M730) and had a few more in stock, all of which had come from the manufacturer with rubber seals too small. He told me I was the first person to mention the problem. What do you think is stranger, that Shimano shipped cups with rubber seals that were too small, or that I was the first person to mention the problem?

The seller was willing to have me return the silver cups for a refund, exchange them for another sets of black cups, or anything else I might consider fair. At the suggestion of Hal Ruzal, I bought a pair of O rings for 50 cents each that fit perfectly in the silver cups. I thought this would work but unfortunately the O rings were too tight on the spindle, preventing it from spinning freely, and a spindle must spin. I then found seals on eBay that were the right size for the silver cups. The seller of the cups accepted my proposal that he buy a pair of seals for me. While waiting for the seals to arrive I installed the black cups on my bike.
Freehub Body and Hubs
After I installed the cranks, pedals, and a new chain, I discovered that the freehub body had seized, meaning that coasting was not possible. I sprayed the freehub body with WD-40, put a 28-tooth cog on the freehub body, and used a hammer to turn the cog backwards, eventually unseizing the freehub body. I knew that I had to clean and lubricate the freehub body, which required first removing it from the hub. After removing the rear axle, I inserted my TL-FH10 freehub body removal tool (fortunately I own this special tool) into the freehub body, placed a 12-inch adjustable wrench on the tool, and hit the wrench with a heavy hammer until the freehub body unscrewed from the hub.
I cleaned the freehub body by soaking it in 91% isopropyl alcohol (rubbing alcohol), lubricated it with Phil Tenacious Oil, and reinstalled it on the hub. I also cleaned the cups and cones of both axles and installed new grease and bearing balls.
I was quite surprised to find that the freehub body had seized. I think the lesson here is that with all the riding I do, often in the rain, I need to do a complete annual overhaul of my bike even if everything seems to be working well. The front and rear hubs were new when I bought them in December of 2018 and used them to build the wheels I rode on my 90-day, 4,500-mile trip in 2019, during which I parked my bike outside while camping about 30 nights, including when it was raining. Although I've cleaned the cogs many times, this is the first time I've cleaned and lubricated the freehub body and repacked the hubs with new grease and bearing balls.
A Problem Waiting to Happen?
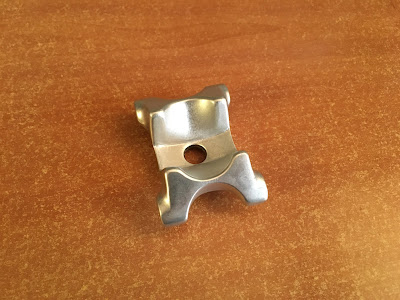
After I completed the assembly of the bike I noticed that the left crank arm had almost no clearance from the cup on the left side, as you can see in the picture below. On my first ride I experienced no rubbing between the cup and the crank, even when out of the saddle and riding hard. But I think that small clearance might be trouble waiting to happen, so I will pay attention for any rubbing. If there is rubbing it could be solved by slightly grinding the crank to increase the clearance. Based on my comparison of the Italian silver cups with the English cups I had been using, I think the silver cups will provide as much clearance as the English cups. If so, I might refrain from using the black cups.

|
| Left crank arm with almost no clearance from the adjustable cup |
Problem Solved!
Using the silver adjustable cup, I experimented with orienting the caged balls one way or the other and discovered that the wrong orientation would decrease the clearance between the adjustable cup and the crank arm.

|
| Plenty of clearance with caged bearing balls installed correctly |

|
| Almost no clearance with caged bearing balls installed incorrectly |
Had I installed the caged bearing balls incorrectly? If so, the clearance problem would be solved. I opened up the bottom bracket and found that I had installed the caged bearing balls on both sides the way I had intended, with the more open side toward the cones. But installed this way the bearing balls do not make contact with the cups. I reinstalled the bottom bracket bearing with the caged bearing balls oriented the other way and thought I would then have normal clearance between the adjustable cup and the crank arm. There was still almost no clearance!
I thought about how I had oriented the spindle with the longer side (dimension C in the diagram below) on the right side of the bike, which I've heard is correct from many people, including several that are very knowledgeable about bikes. But I realized that orienting the spindle (mine has a shell width of 68 mm) that way puts the right pedal 6 mm farther away from the centerline of the bike than the left pedal because the chain rings on the right side move the crank arm farther out. Orienting the spindle with its longer side on the left compensates for the effect of the chain rings on the right, placing the pedals the same distance from the center line.

I reinstalled the spindle with its longer side on the left and now there was clearance between both crank arms and the cups. I had solved the problem of almost no clearance between the left crank arm and the adjustable cup by installing the caged bearing balls correctly and putting the longer side of the spindle on the left side.

|
| Left crank arm with plenty of clearance from the adjustable cup |

|
| Right crank arm with sufficient clearance from the fixed cup |
I'm puzzled about the common notion that the longer side of the spindle belongs on the right side. Why would anyone want the right pedal to be farther to the right than the left pedal is to the left?
It's more satisfying to maintain something old than to buy something new, but it's also a lot more challenging. As Roseanne Roseannadanna would say, it's always something!
If my description of the work on my bottom bracket is difficult to follow, reference to the diagram below could be helpful.

I'm grateful to Hal Ruzal for telling me how to solve the problem of the worn threads in my bottom bracket, for referring me to Dave Perry to retap the threads, and for guiding me regarding problems with the freehub body. Thank you, Hal!
You can see an updated complete list of all my bike's components here: My Bike
To subscribe to this blog, click here.

Comments
Post a Comment