Gear Update: Saddle, seat post, and cassette
Everything put together sooner or later falls apart. -Paul Simon
In this post I describe changes I've made to my bike since publishing Planning: Gear (Update IV) in September of 2019. I will soon publish a separate post about other changes I've made to my gear.
Saddle and seat post
In late October of 2020 I noticed a crack in the right side of my saddle. While I was removing the saddle in order to repair it I saw that there was a crack in part of the seat clamp.

|
| Crack in the saddle |

|
| Crack in the seat clamp |
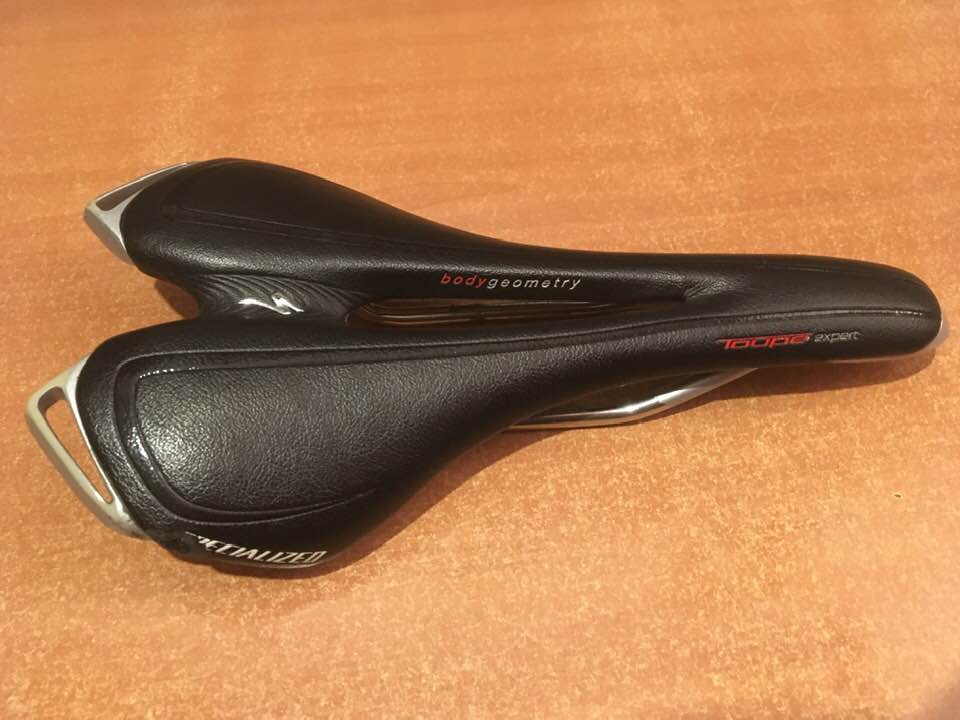
I attempted to repair the crack in the saddle with Bondic but was not successful. A piece of styrofoam I inserted between the shell of the saddle and the rails helped to minimize the sagging but I knew it was time to replace the saddle. In late November I found on eBay a Specialized Toupe Expert, the same model as the saddle I've ridden for ten years. Coming from the U.K., the saddle was not installed until mid December.

|
| Styrofoam between the shell and the rails |
|
| Specialized Toupe Expert saddle from the U.K. via eBay |
The crack in the aluminum seat clamp could not be repaired, so I bought a replacement clamp which I was able to use temporarily even though it did not mate properly with the seat post. I soon found a beautiful Shimano Dura Ace SP-7400 seat post on eBay.

|
| Dura Ace SP-7400 seat post |
Installing the Dura Ace seat post would require removing the old post that hadn't been removed for ten years and which was stuck. I watched several videos to prepare myself for the postectomy and bought a jab saw in case I needed to cut the old post. I also borrowed a 36-inch pipe wrench from the hardware store on my block in case I needed more leverage than I could get from my 12-inch adjustable wrench.

|
| Jab saw |
I was pleased that the removal of the seat post was much easier than I had anticipated. I applied WD-40 to the post and repeatedly turned it with a 12-inch adjustable wrench. The video below shows the final stage of the removal.
I greased the new seat post before installing it, something I'm not sure I did when I installed the old one (grease prevents galvanic corrosion which is the cause of the seizing). One of the two parts of the seat binder bolt broke as I tightened it. I couldn't find a replacement bolt in any local bike shop, but an M6 x 20 mm hex bolt from Home Depot worked perfectly, allowing me to complete the installation of the seat post. I bought a Problem Solvers seat binder bolt online that I will eventually use.

|
| Broken seat binder bolt |
I had removed my rear rack before extracting the stuck seat post, and then reinstalled the rack in preparation for a three-day trip to Milford, PA. I dented the seat tube while doing so because the 200-mm Dura Ace seat post was not long enough to extend below the mount of the rack, leaving the seat tube vulnerable. I wrote about that ordeal in a previous post, but I didn't mention that I also discovered a crack in the left seat stay.

|
| Crack in the left seat stay |
Although I can ride the bike with its damaged seat tube and seat stay, at least until the crack in the seat stay develops to the point of being dangerous, I started exploring options for replacing the frame, including buying a used frame or entire bike or having a frame built for me. I posted a message in several bike forums and received many responses. Some offered bikes for sale and others suggested frame builders. David from the Facebook group Steel is Real !!! wrote that he thought he could fix both the seat stay and the seat tube and asked me to give him the frame if I decided to scrap it. He told me how he repaired a seat tube that was damaged much worse than mine. When David inspected the damage to my bike he repeated that he thought could repair it. I will have him make the repairs when it fits into his schedule. I plan to do all the touch-up paint work, not just to the damaged areas of the seat stay and seat post, but throughout the bike.
A few days after my three-day trip to Milford, PA, I bought, in anticipation of replacing my frame (I had not yet heard from David), the 250-mm Cinelli Via Folli seat post which perfectly matches my Cinelli stem. Being 50 millimeters (almost two inches) longer than the Dura Ace post, it will protect the seat tube from being damaged by the rack.

|
| Cinelli Via Folli seat post |
I look forward to having my frame repaired and its paint touched up, and the Cinelli seat post installed.
Cassette
Since July of 2018 my cassette consisted of cogs with 12, 14, 16, 18, 20, 23, and 28 teeth. This worked well, but in early November of 2020 I changed to 12, 15, 17, 19, 21, 24, 28 which made for much smoother shifting between the two largest cogs. Unfortunately backpedalling in the 48/24 combination would sometimes make the chain jump to the 21 cog, so I reverted to the previous cassette. In late December I again changed to 12, 15, 17, 19, 21, 24, 28 and made an adjustment to the rear derailleur that seems to help avoid the jumping of the chain when backpedalling. I also tried 12, 15, 17, 19, 22, 25, 28 which I think I would prefer, but could find no way to avoid the jumping.

Comments
Post a Comment