Planning Cross Country 2024 - Update June 27, 2024
In the last few months I've made many improvements to my gear.
Front light on fork
David Brorein, the expert machinist who has done several brilliant jobs for me, modified the mount for my front light so that it could be attached to my fork rather than my head tube. The light will now always shine in the direction the front wheel is pointed.

Custom-made biking shorts and tights
Last summer, the two pairs of shorts made for me in 2019 by Miguel Llaguer Restituyo of Alteration Specialists had become stretched out and were overdue for replacement. (Read about those shorts here.) As I did in 2019, I supplied Miguel with one of the shirts I wear along with elastic from Pacific Trimming for the waistband. Miguel refashioned the shirt into a pair of shorts with a pouch for my genitals and no chamois.
Miguel was not available when I wanted to have some alterations to the shorts, but Tyrone Jones of Alteration Specialists did an expert job of making all the needed adjustments so that the shorts would fit perfectly.
Arkadiy of Digital Cleaners replaced the waistband in the custom-made lightweight tights I've had for many years and which I will wear when the temperature is below 50.
New zippers for trunk bag
After returning home from my trip in early June, the slider of one of the zippers on the outside pocket of my trunk bag split in two.

I had Uriel Gurgov replace the zippers on both of the outside pockets with much stronger zippers. I'm glad the zipper failed while at home rather than out on the road.

Packing of tent pole bag
By using elastic hair ties to secure my stakes, extra lines, and digging tool to my tent pole, I am now able to easily insert those items into my tent pole bag and to remove them from the bag.

Custom bag for spare tire
I'm also using elastic hair ties rather than zip ties around my spare tire. And rather than using a plastic bag or umbrella cover to protect the spare tire, I'm using a custom bag made by Jared Baker of Simply Light Designs.

To secure the spare tire to the rack I will use three Voile straps, two 15" and one 12".

Stuff sacks for cold-weather riding clothing and water bladder
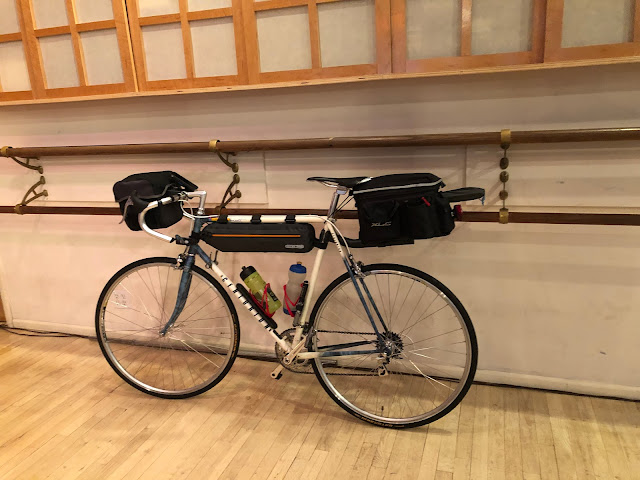
I previously wrote that when not wearing my jacket, I would fold it neatly and then secure it to the top of my trunk bag with a pair of bungee cords. I also wrote that perhaps I can find a jacket just as warm as the one I have but with much less bulk. That seems to be impossible, so I will take the jacket I have. That jacket is water-repellant but not waterproof, but fortunately I am able to comfortably wear my windbreaker over the jacket, which I will do when necessary. I wrote that I would store my jacket in a ziplock bag. Instead I will use a Sea to Summit 5-litre stuff sack which will also hold my second long-sleeve wool shirt, tights, socks with 4-inch ankles, fingered gloves, and cap.

When my water bladder is in use I will also carry it on top of the trunk bag in a Sea to Summit 3-litre stuff sack.

I had thought that I might not need my cold-weather riding clothing until after Hamilton, Montana, in which case I would have had that clothing sent to Hamilton so that I would not have to carry it for the first 1130 miles of my trip. But Stan Redmond, a friend who in 2022 rode the Trans Bike Bike Race route (which I'm following until southern Illinois), advised me that from the beginning of my trip until Pueblo, Colorado, there could be days during which the temperatures during riding hours could be in the 40s. So I will start the trip with my cold-weather riding clothing and send it home from Pueblo.
When I don't need to wear my cold-weather riding clothing but I do need to use my water bladder, I will carry it all as shown in the picture below.

Besides the long green bungee cords in the picture above, I will also bring a shorter pair of red bungee cords for when I have a smaller load on top of the trunk bag.
Long 6 mm hex key needed
While rehearsing the packing of my bike for shipping I learned that I am not able to produce enough force using my PocketRatchet to tighten the stem in the steering tube. I will therefore carry a 6 mm hex key that is about five and one half inches long.
Replacement of mount for handlebar bag
When I installed the mount for my Ortlieb handlebar bag in 2019, the mount was slightly crushed and pulled off-center to the left. I must have overtightened the cable securing the mount to the handlebar. The mount has worked fine, but I'd prefer that it be centered and not crushed, so I replaced it and was careful to not overtighten the cable.

I couldn't center the mount perfectly because it tends to shift to the left as it is tightened. Maybe I need to have it off-center to the right before I start tightening.
Stabilizers for handlebar bag
In order to reduce the tendency for my bike to shimmy due to the sideways oscillation of the handlebar bag relative to the handlebar, I created a pair of stabilizers using Infinity Tools, one on each side of the bag.


The knobs on the sides of the handlebar bag were designed for a carrying strap which I don't use. Fortunately they are the perfect size and in the perfect location for attaching the stabilizers.
Improvement to top tube bag
Although I've always loved my Ortlieb Top Tube Bag, I've been disappointed by the way it is attached to the top tube. The three straps slip from their original position, and the ends of the straps flare out, so that I've needed to apply gaffer's tape to prevent my right leg from being irritated by the end of the straps. I solved this problem by replacing each of the straps with an appropriate length of double-sided hook and loop tape.
Here are pictures from the right and left of one of the original straps.


Here are pictures from the right and left of one of the new straps.


What an improvement this is!
Electrolytes and liquid chlorophyll
While Jim Belilove (my brother-in-law) and his wife Ginger (my sister-in-law^2?) were visiting Lori and me, Jim suggested replacing 40,000 Volts! liquid electrolyte with powered electrolyte to be mixed with water, thereby reducing both weight and the need to resupply. Beth McDonald, my nutritionist, suggested taking packs of LMNT Zero-Sugar Electrolytes which cost $1.50 per pack. Doing so would reduce both weight and the need to resupply, but on the LMNT website I found the page How to make LMNT’S electrolyte drink mix at home. By making my own electrolyte powder according to LMNT's formula I will reduce the cost of a single serving to 6 cents.
Here are the ingredients I used to make the electrolyte powder:
Canning & pickling salt
Potassium chloride
Magnesium malate
I chose to use canning and pickling salt because it has no additives and therefore no anti-caking agents containing aluminum. Keith from Morton Salt was helpful in identifying that option and telling me I could buy it at the ACME Market in Edgewater, New Jersey, just a short ride from my home. I made a batch of about eight cups.
One teaspoon of electrolyte powder is a single serving, which I will put in a water bottle (0.75 liters). To measure the electrolyte powder I will use a stainless steel teaspoon. I will carry 2 cups (96 servings) of electrolyte powder in a 7" x 7" 4-mil reclosable plastic bag from Collecting Warehouse. I don't know how many servings I will have each day, but I do expect to need to resupply, maybe monthly.
NOTE: On Day 9 of Cross Country 2024 I cut back to 1/2 teaspoon per water bottle.

I will also use a 3" x 6" 4-mil reclosable plastic bag to hold my liquid chlorophyll so that it doesn't stain my trunk bag. Kathy and Matt from Collecting Warehouse were helpful answering questions and sending samples. They carry a huge variety of different sizes of plastic zipper bags. I never knew bags of so many sizes existed!
Saddle bag to carry cleat covers
Ginger Belilove noticed that there was an open space under my saddle and said "You could put something there". I bought a Specialized Wedgie Seat Bag in which I will store my cleat covers when not in use. Previously I've stored them in my handlebar bag, but storing them in the Wedgie will be more convenient, especially when they are wet. If I installed the Wedgie as originally intended, access to its compartment would be blocked by the orange stuff sack holding my cold-weather clothing. So I changed one of the Wedgie's straps and installed in a way that makes it easy to access its compartment.

Daily contact lenses
Jim Belilove also suggested replacing my contact-lens cleaner with a powder that could be mixed with water to clean my lenses. I was unable to find any such powder, but in response to my question in a Facebook group about that option, someone said she always carries daily lenses on bike trips, avoiding the need to carry any cleaner. I ordered some daily lenses and will carry a month's supply which weighs about 5 ounces, so I will not have to carry a 12-ounce bottle of contact-lens cleaner which weighs about 15 ounces. I will need to resupply every month.

Each contact lens, whether daily or monthly, comes in a small vial which is discarded. Daily contact lenses therefore have thirty times the packaging of monthly lenses, making them as wasteful as coffee that comes in single-serve containers. So I will never use daily contact lenses except for trips longer than one month.
My bike fully loaded
Around the time of my trip with Mike Macewich from Springfield to Chicago in 1973, I remember saying 30 pounds of bike and 30 pounds of gear. On my 90-day trip in 2019 the total weight of my loaded bike was never more than 50 pounds. On my trip in early June the total weight was 55 pounds. The maximum total weight for at least the first 32 riding days of my upcoming cross-country trip will be 62 pounds, two pounds more than what it was for my trip from Springfield to Chicago in 1973.


If you post a comment, please identify yourself,
preferably by using your Google account.


You've approached all of this in a very scientific way, and it appears that these solutions will serve you well.
ReplyDeleteYour descriptions are extensive and precise enough that you could conceivably get some of these makers to sponsor you. That may not interest you, but I'm just commenting on how well you speak of the products.
Seeing all that stuff on your bike leads me to remind you to make sure your tires are well inflated every day, especially the rear.
You mentioned to me in person that you're not sure what you will do if you want to replace a rim since the model you have isn't currently available. There are a few good choices. One of them is a rim I built into a wheel a year or so ago that is holding up well. The brand is Son (or SON?) and the model is TB-14. It has the nice old fashioned non-aero styling, and it's silver.
Good Luck! You got this! -Stan
ReplyDeleteGood luck John. Rick Jennings
ReplyDelete